TensorFlow Data Flow Graph Optimization

TensorFlow represents an user program as a computation graph/data flow graph where each node represents a mathematical computation eg. add, subtract, matrix multiply, ReLU, etc and each edge represents input/output tensor data. A node has zero or more input edges and zero or more output edges. Data flow graph is an important design because TensorFlow can perform the following code optimizations using the knowledge about the computation graph.

  • Remove dead nodes. These are the source nodes, sink nodes, control flow nodes, and stateful nodes.
  • Remove identity nodes. (https://github.com/tensorflow/tensorflow/blob/master/tensorflow/core/common_runtime/function.cc)
  • Perform constant folding to check if a node can be evaluated as constant and therefore eligible for subsequent constant propagation.
  • Perform function inlining.
  • Perform common subexpression elimination. This technique is to find the common subexpressions within the graph and replacing them with a single computation to avoid redundant computation Read more about common subexpression elimination here

Check out the full implementation in graph_optimizer.cc

https://github.com/tensorflow/tensorflow/blob/master/tensorflow/core/common_runtime/graph_optimizer.cc

https://github.com/tensorflow/tensorflow/blob/master/tensorflow/core/common_runtime/constant_folding.cc

https://github.com/tensorflow/tensorflow/blob/master/tensorflow/core/graph/optimizer_cse.cc

TensorFlow Papers

Great papers on TensorFlow

A Tour of TensorFlow

TensorFlow: A System for Large-Scale Machine Learning

TensorFlow: Large-Scale Machine Learning on Heterogeneous Distributed Systems

A Comparison of Distributed Machine Learning Platforms

TensorFlow Estimators: Managing Simplicity vs. Flexibility in
High-Level Machine Learning Frameworks

The TensorFlow Partitioning and Scheduling Problem: It’s the Critical Path!

Run Tensorflow on Mac using Docker

Here are the steps to run Tensorflow on Mac using Docker

1) Install docker
https://docs.docker.com/docker-for-mac/install

2)Launch docker container with Tensorflow CPU binary image and launch a Jupyter notebook

docker run -it -v /MY_LOCAL_COMPUTER_DIR:/MAPPED_DIR_ON_DOCKER -p 8888:8888 -p 6006:6006 tensorflow/tensorflow

Note: -v is to map your specified local directory to a directory on Docker. In this way, you can make your specified local directory accessible in your Docker instance. In my example command below, I specified this local directory on my computer /Users/weishungchung/aiformankind to be made available on Docker instance as /aiformankind.

docker run -it -v /Users/weishungchung/aiformankind:/aiformankind -p 8888:8888 -p 6006:6006 tensorflow/tensorflow

Screen Shot 2018-05-24 at 7.12.10 PM

3) Copy the Jupyter notebook URL printed on the console (replace localhost with 192.168.99.100, this is docker-machine default ip)

http://192.168.99.100:8888/?token=7b91b5a355727bcf3ae1da7135a96e68bca40ccad673bf21

4) Log into Jupyter using the given token

Screen Shot 2018-05-24 at 7.14.53 PM
5) Open the hello_tensorflow.ipynb notebook and run it

Screen Shot 2018-05-24 at 7.19.50 PM

6) Open and run the 3_mnist_from_scratch.ipynb

Screen Shot 2018-05-24 at 7.23.47 PM

7) Install Keras

Log into docker container

Open another terminal, we want to log into container to install Keras.

On the terminal, run the command below

eval "$(docker-machine env default)"

Find your container id by running docker ps
You can see your container id in the console printout. In this example, mine is 2b89e5ae9430

docker ps

CONTAINER ID        IMAGE                   COMMAND                  CREATED             STATUS              PORTS                                            NAMES
2b89e5ae9430        tensorflow/tensorflow   "/run_jupyter.sh --a…"   41 minutes ago      Up 41 minutes       0.0.0.0:6006->6006/tcp, 0.0.0.0:8888->8888/tcp   dazzling_villani

Then log into container by running the following command
(In this example, 2b89e5ae9430 is the container id)

docker exec -it 2b89e5ae9430  bash

Screen Shot 2018-05-24 at 8.01.00 PM

8) Once you are in the container, you are ready to install Keras

pip install keras

Screen Shot 2018-05-24 at 8.08.53 PM

9) Verify Keras version by running the following python command

python -c 'import keras; print(keras.__version__)'

Screen Shot 2018-05-24 at 8.17.11 PM

Deep Learning on AWS GPU Instance

Amazon has released a Deep Learning AMI and makes the process of running deep learning on GPU way easier than before. Before the availability of this AMI, I had to go through the painstaking process of installing all the required CUDA and cuDNN libraries and then spending lots of time in debugging just to get everything running. This AMI makes the on-boarding process much much easier and smoother. Great works indeed !

Follow the steps in the following blog to launch the instance.
https://aws.amazon.com/blogs/machine-learning/get-started-with-deep-learning-using-the-aws-deep-learning-ami/

Go to AWS Marketplace, search for deep learning AMI (ubuntu) and create an instance from the image

Screen Shot 2018-03-31 at 9.58.13 AM

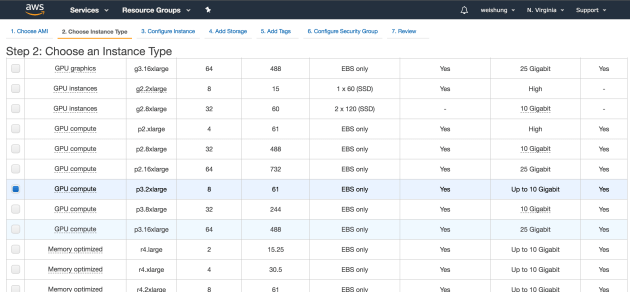
Select the p3.2xlarge instance type. Make sure you check the hourly pricing for selected instance. It adds up quickly for GPU instance. For p3.2xlarge instance, it costs ~ $3.06/hour. See this EC2 pricing link.

Note: Remember to terminate your instance after use.

Screen Shot 2018-04-08 at 2.08.53 PM

Review and Launch your instance

Screen Shot 2018-04-08 at 2.11.38 PM

Screen Shot 2018-03-31 at 10.02.21 AM

SSH to your new instance

ssh -L localhost:8888:localhost:8888 -i ~/.ssh/my-key-pair.pem ubuntu@xx.xxx.xxx.xxx


Screen Shot 2018-04-08 at 3.08.48 PM

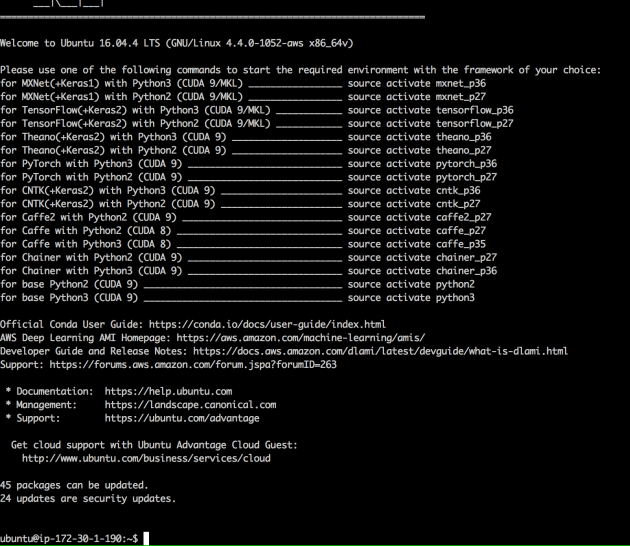
Activate TensorFlow + Keras 2 on Python 3 with CUDA 8 using the following command

source activate tensorflow_p36


Run some examples
cd ~/tutorials/TensorFlow/board

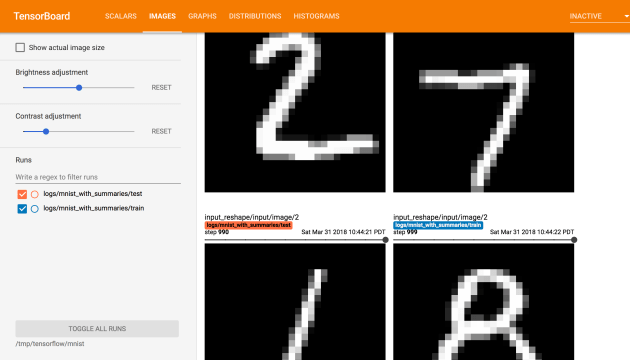
python mnist_with_summaries.py
Screen Shot 2018-03-31 at 10.43.36 AM.png

Start tensorboard using the following command. You can then access the tensorboard UI at http://your-aws-instance-public-ip:6006
tensorboard --logdir=/tmp/tensorflow/mnist
Screen Shot 2018-04-08 at 3.22.42 PM

Screen Shot 2018-03-31 at 12.18.52 PM

Try out other examples

git clone https://github.com/keras-team/keras.git

cd keras/examples

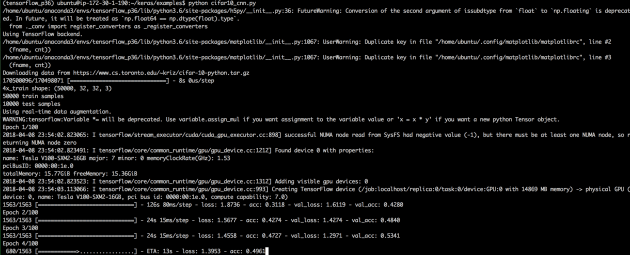
python cifar10_cnn.py

Screen Shot 2018-04-08 at 4.56.48 PM


Spark 2.3.0

Great news ! Spark 2.3.0 was released yesterday. This new release comes with many great features, checkout the release note

One of the many notable features is the Spark on Kubernetes support. It provides a new kubernetes scheduler backend that supports native submission of spark jobs to a kubernetes cluster.

For those who are interested in the details of implementation, you can check out the  Spark on Kubernetes Design Proposal

Here is the associated Jira ticket https://issues.apache.org/jira/browse/SPARK-18278

Spark History Server

Spark application Web UI is short-lived, only available for the duration of the job. Once the application is done, you won’t be able to access it anymore. To allow continued access even after the application is completed is to utilize the Spark History Server. To do that, we need to specify the following two settings during Spark application submission

spark.eventLog.enabled=true
spark.eventLog.dir=/path/to/log/dir (default is /tmp/spark-events)

As you can see in the SparkContext class below, the two settings are retrieved from SparkConf

private[spark] def isEventLogEnabled: Boolean = _conf.getBoolean("spark.eventLog.enabled", false)
private[spark] def eventLogDir: Option[URI] = _eventLogDir
_eventLogDir = if (isEventLogEnabled) {
        val unresolvedDir = conf.get("spark.eventLog.dir", EventLoggingListener.DEFAULT_LOG_DIR)
          .stripSuffix("/")
        Some(Utils.resolveURI(unresolvedDir))
      } else {
        None
      }

If the eventLogEnabled setting is true, SparkContext will then create EventLogSparkListener to be added to the LiveListenerBus’s event log queue.

_eventLogger =
      if (isEventLogEnabled) {
        val logger =
          new EventLoggingListener(_applicationId, _applicationAttemptId, _eventLogDir.get,
            _conf, _hadoopConfiguration)
        logger.start()
        listenerBus.addToEventLogQueue(logger)
        Some(logger)
      } else {
        None
      }

As EventLoggingListener gets notified of various SparkListenerEvents, it writes to a persistent log file.

The log file will have a .inprogress suffix as long as the application is still running. It will get renamed after the job is completed.

val IN_PROGRESS = ".inprogress"
val DEFAULT_LOG_DIR = "/tmp/spark-events"

val workingPath = logPath + IN_PROGRESS

Here is the list of different SparkListenerEvents.
SparkListenerStageSubmitted
SparkListenerStageCompleted
SparkListenerTaskStart
SparkListenerTaskGettingResult
SparkListenerSpeculativeTaskSubmitted
SparkListenerTaskEnd
SparkListenerJobStart
SparkListenerJobEnd
SparkListenerEnvironmentUpdate
SparkListenerBlockManagerAdded
SparkListenerBlockManagerRemoved
SparkListenerUnpersistRDD
SparkListenerExecutorAdded
SparkListenerExecutorRemoved
SparkListenerExecutorBlacklisted
SparkListenerExecutorUnblacklisted
SparkListenerNodeBlacklisted
SparkListenerNodeUnblacklisted
SparkListenerBlockUpdated
SparkListenerExecutorMetricsUpdate
SparkListenerApplicationStart
SparkListenerApplicationEnd
SparkListenerLogStart

@DeveloperApi
case class SparkListenerStageSubmitted(stageInfo: StageInfo, properties: Properties = null)
  extends SparkListenerEvent

@DeveloperApi
case class SparkListenerStageCompleted(stageInfo: StageInfo) extends SparkListenerEvent

@DeveloperApi
case class SparkListenerTaskStart(stageId: Int, stageAttemptId: Int, taskInfo: TaskInfo)
  extends SparkListenerEvent

@DeveloperApi
case class SparkListenerTaskGettingResult(taskInfo: TaskInfo) extends SparkListenerEvent

@DeveloperApi
case class SparkListenerSpeculativeTaskSubmitted(stageId: Int) extends SparkListenerEvent

@DeveloperApi
case class SparkListenerTaskEnd(
    stageId: Int,
    stageAttemptId: Int,
    taskType: String,
    reason: TaskEndReason,
    taskInfo: TaskInfo,
    // may be null if the task has failed
    @Nullable taskMetrics: TaskMetrics)
  extends SparkListenerEvent

Here is the logEvent method used by listener to write the events to the log file.

/** Log the event as JSON. */
  private def logEvent(event: SparkListenerEvent, flushLogger: Boolean = false) {
    val eventJson = JsonProtocol.sparkEventToJson(event)
    // scalastyle:off println
    writer.foreach(_.println(compact(render(eventJson))))
    // scalastyle:on println
    if (flushLogger) {
      writer.foreach(_.flush())
      hadoopDataStream.foreach(ds => ds.getWrappedStream match {
        case wrapped: DFSOutputStream => wrapped.hsync(EnumSet.of(SyncFlag.UPDATE_LENGTH))
        case _ => ds.hflush()
      })
    }
    if (testing) {
      loggedEvents += eventJson
    }
  }

On start, the Spark History Server reads and replays the log data in the configured log directory, specified by spark.eventLog.dir setting in SparkConf. You can find the checkForLogs() method in FsHistoryProvider.scala. In this method, it first scans the log directory to find any unread logs and submits them to a thread pool (replayExecutor) to be replayed. The number of processing threads can be specified via spark.history.fs.numReplayThreads in Spark configuration. If the setting is not specified, the number of threads will be default to 1/4 of available processors on the Java virtual machine. FsHistoryProvider is the concrete implementation of abstract class ApplicationHistoryProvider. The main purpose of this class is to provide the log data for display on the Web UI. Spark History Server initializes this class dynamically via reflection during start up. It defaults to FsHistoryProvider if spark.history.provider is not set in the Spark configuration.

See the checkForLogs() method below.

/**
   * Builds the application list based on the current contents of the log directory.
   * Tries to reuse as much of the data already in memory as possible, by not reading
   * applications that haven't been updated since last time the logs were checked.
   */
  private[history] def checkForLogs(): Unit = {
    try {
      val newLastScanTime = getNewLastScanTime()
      logDebug(s"Scanning $logDir with lastScanTime==$lastScanTime")
      // scan for modified applications, replay and merge them
      val logInfos = Option(fs.listStatus(new Path(logDir))).map(_.toSeq).getOrElse(Nil)
        .filter { entry =>
          !entry.isDirectory() &&
            // FsHistoryProvider generates a hidden file which can't be read.  Accidentally
            // reading a garbage file is safe, but we would log an error which can be scary to
            // the end-user.
            !entry.getPath().getName().startsWith(".") &&
            SparkHadoopUtil.get.checkAccessPermission(entry, FsAction.READ) &&
            recordedFileSize(entry.getPath()) < entry.getLen()         }         .sortWith { case (entry1, entry2) =>
          entry1.getModificationTime() > entry2.getModificationTime()
        }

      if (logInfos.nonEmpty) {
        logDebug(s"New/updated attempts found: ${logInfos.size} ${logInfos.map(_.getPath)}")
      }

      var tasks = mutable.ListBuffer[Future[_]]()

      try {
        for (file <- logInfos) {           tasks += replayExecutor.submit(new Runnable {             override def run(): Unit = mergeApplicationListing(file)           })         }       } catch {         // let the iteration over logInfos break, since an exception on         // replayExecutor.submit (..) indicates the ExecutorService is unable         // to take any more submissions at this time         case e: Exception =>
          logError(s"Exception while submitting event log for replay", e)
      }

      pendingReplayTasksCount.addAndGet(tasks.size)

      tasks.foreach { task =>
        try {
          // Wait for all tasks to finish. This makes sure that checkForLogs
          // is not scheduled again while some tasks are already running in
          // the replayExecutor.
          task.get()
        } catch {
          case e: InterruptedException =>
            throw e
          case e: Exception =>
            logError("Exception while merging application listings", e)
        } finally {
          pendingReplayTasksCount.decrementAndGet()
        }
      }

      lastScanTime.set(newLastScanTime)
    } catch {
      case e: Exception => logError("Exception in checking for event log updates", e)
    }
  }


Get preferred locations for RDD’s partitions

When DAGScheduler submits a Stage for execution, it fetches the preferred locations (TaskLocations) to run tasks on partitions for a RDD from BlockManagerMaster which in turn reach out to  the driver’s RPC endpoint for the infos.  TaskLocation is either a host or (host, executorID) pair. The purpose is to achieve data locality when running a task. It is always preferred to run task on a host which has the required data block in memory.

DAGScheduler class has a getCacheLocs method. In this method, DAGScheduler will first check if the preferred locations (TaskLocation) has been fetched before by checking its internal cacheLocs hashMap. If the internal cacheLocs does not contain the information for the RDD, it will then call blockManagerMaster.getLocations to fetch the preferred locations for all the partitions within the RDD. Once fetched, task locations will be kept in the cacheLocs hashMap.

See DAGScheduler’s getCacheLocs method below.

private[scheduler]
  def getCacheLocs(rdd: RDD[_]): IndexedSeq[Seq[TaskLocation]] = cacheLocs.synchronized {
    // Note: this doesn't use `getOrElse()` because this method is called O(num tasks) times
    if (!cacheLocs.contains(rdd.id)) {
      // Note: if the storage level is NONE, we don't need to get locations from block manager.
      val locs: IndexedSeq[Seq[TaskLocation]] = if (rdd.getStorageLevel == StorageLevel.NONE) {
        IndexedSeq.fill(rdd.partitions.length)(Nil)
      } else {
        val blockIds =
          rdd.partitions.indices.map(index => RDDBlockId(rdd.id, index)).toArray[BlockId]
        blockManagerMaster.getLocations(blockIds).map { bms =>
          bms.map(bm => TaskLocation(bm.host, bm.executorId))
        }
      }
      cacheLocs(rdd.id) = locs
    }
    cacheLocs(rdd.id)
  }
/**
   * Recursive implementation for getPreferredLocs.
   *
   * This method is thread-safe because it only accesses DAGScheduler state through thread-safe
   * methods (getCacheLocs()); please be careful when modifying this method, because any new
   * DAGScheduler state accessed by it may require additional synchronization.
   */
  private def getPreferredLocsInternal(
      rdd: RDD[_],
      partition: Int,
      visited: HashSet[(RDD[_], Int)]): Seq[TaskLocation] = {
    // If the partition has already been visited, no need to re-visit.
    // This avoids exponential path exploration.  SPARK-695
    if (!visited.add((rdd, partition))) {
      // Nil has already been returned for previously visited partitions.
      return Nil
    }
    // If the partition is cached, return the cache locations
    val cached = getCacheLocs(rdd)(partition)
    if (cached.nonEmpty) {
      return cached
    }
    // If the RDD has some placement preferences (as is the case for input RDDs), get those
    val rddPrefs = rdd.preferredLocations(rdd.partitions(partition)).toList
    if (rddPrefs.nonEmpty) {
      return rddPrefs.map(TaskLocation(_))
    }

    // If the RDD has narrow dependencies, pick the first partition of the first narrow dependency
    // that has any placement preferences. Ideally we would choose based on transfer sizes,
    // but this will do for now.
    rdd.dependencies.foreach {
      case n: NarrowDependency[_] =>
        for (inPart <- n.getParents(partition)) { val locs = getPreferredLocsInternal(n.rdd, inPart, visited)           if (locs != Nil) {             return locs           }         }       case _ =>
    }

    Nil
  }

In BlockManagerMaster, getLocations method sends a RPC request to driver end point to get the preferredLocations.


  /** Get locations of multiple blockIds from the driver */
  def getLocations(blockIds: Array[BlockId]): IndexedSeq[Seq[BlockManagerId]] = {
    driverEndpoint.askSync[IndexedSeq[Seq[BlockManagerId]]](
      GetLocationsMultipleBlockIds(blockIds))
  }